Tips and Tricks: Getting Your G

After exactly one year of waiting, I finally completed my G a few weeks ago. I can finally say that I’m a real adult! This is the second part on how to get your G Driver’s License in Ontario. You can first part on how to get G2 here.

Just like last year, I went to a smaller town to do my road test. Instead of going to Oshawa though, I went to Guelph this year. One main benefit of going to Guelph is the fact that the closest freeway/highway to the test centre has a speed limit of 70 km/h and is overall less congested than the 401.

Overall, the G2 Exit test is the same as the G2 Entrance (i.e. the first road test) with the exception of the highway driving. They will still be looking at your turns, your roadside stops, your parallel parking, etc. As long as you can drive on the highway safely and you passed your G2 Entrance test, you should be able to pass your G2 Exit test too.

TIPS: BOOKING IN ADVANCE

  1. Smaller towns often have less traffic and less aggressive drivers on the road. This can make it less stressful for you to be on the road when you’re taking the driving test. If you do go out of town for your driving test, be sure to go early and practice in the area so you get a feel for the roads.
  2. If you are testing during the summer (late June to early September), try to book as far in advance as possible so you don’t get stuck with a bad time. The best time of the day is in the late morning like 10:30 or mid-afternoon like 2.
  3. Just in case, you may want to get a few extra lessons from your previous driving instructor to make sure that you haven’t forgotten anything in the year (or more) that you’ve been driving without them.

TIPS: DAY OF THE TEST

  1. Go early and practice in the area that you will be tested in. This will help you catch any mistakes you may make before the test; make you feel more comfortable with the area; and get you back in the flow of driving.
  2. The test should last no longer than 25 minutes. You will drive onto the highway almost immediately and then get off at the first exit. If there is too much traffic for you to smoothly transition onto the highway at the speed limit, you will be taken back to where you got onto the highway the first time so that you can merge again. You will then be taken into a residential area where you will be asked to do a combination of an emergency stop, a three point turn, a parallel park and/or a downhill/uphill park. You will then head back to the test centre.

Guelph

TIPS: AT THE TEST CENTER

  1. The MTO website suggests that you arrive at the test centre 30 minutes before your test. You may want to go 45 minutes earlier as there is usually a long line to register for the driving test.
  2. Reverse park into one of the available parking spots which are at the back of the building. This will make it easier for you to get out of the spot later during your test. It may take you a while to get into the spot but at least no one will be marking you at this time! (Or you can ask your fully licensed G driver to do it for you if you’re not quite there yet 😉 )
  3. Before heading into the centre, make note of: the Brand of your Car and the License Plate number.
  4. When you go into the centre, you will see two lines: on the left side there’s a line for general inquiries and on the right side there’s a line for driving test applicants. Go to the line for driving test applicants. It should take about 10 minutes to get to the front of the line.
  5. Once you get to the desk, the MTO employee will ask you for your G2 ID and then ask you for the following information (you will have to state this information, even though they can see some of it): your full name, your birth date, your address, and make and model of your car.
  6. The MTO employee will instruct you to sit inside of your car and wait for the tester to come out. My tester arrived a few minutes later than my appointment time but try to relax if that happens to you. Stressing out will only cause you to make mistakes!
  7. You will be asked to verify that your signals, brake light and horn work so make sure they do before you go in for the test.
  8. Once your tester gets in the car, the MTO employee will ask you how many times you’ve driven on a highway over 80 km/h as well as how many hours you have been driving in the last 6 months.

TIPS: SCORES

  1. The test is scored out of 100. You begin with 100 points and every time you make a mistake you will lose either 2 points for a minor mistake (indicated with a check mark) or 4 points for a major mistake (indicated with an x).

    You need 70 points to pass so you can make 15 minor mistakes, 7 major mistakes or a combination of the two to pass. Major mistakes include failing to signal at intersections, during a lane change, etc. Minor mistakes include wide or tight turns, not checking intersections before you pass them, etc.

    In the photo below, you will see my test and the types of things that they are looking for:

IMG_4810

TIPS: DRIVING TEST 

  1. This driving centre was less busy than any other that I’ve visited before. It seemed that there were only a handful of driving routes that students were being taken on. Exiting the plaza from the Silvercreek Pkwy entrance, you will head south until you reach Woodlawn. You make a right to head West on Woodlawn until you get to the entrance to the highway. You then make a left to head South on Highway 6.

    Note that there is a rather short distance for you to accelerate onto the highway. If there was a lot of traffic and you could not merge at the speed limit, you will be asked to take a right at Willow Road and head west. At the first intersection, you will go back north on Marksam Road until you get to Speedvale Road where you make a right to head west and then you merge onto the highway from the right.

    You will head south until you get to Willow Road where you will now make a left to head east. At Guelph Street, you will make a right into the residential area to do your emergency stop, parallel park and three point turn. You will then exit the residential area by heading back towards Willow Road to go east. Once you reach Dawson, you will make a left and then head north until you get back to the plaza which will be on your left side.

TIPS: AFTER THE TEST

  1. You will get a yellow sheet that confirms that you passed your test and you will be told to go back inside. Make sure that the tester writes that you have passed!
  2. Enter the line on the left side for general inquiries. They will give you a ticket. Wait until your number is called and then they will give you your temporary license. You won’t need to take a new photo and you won’t be asked to take an eye exam again. Congratulations on passing!!
  3. If you were like me and passed a few days before your license expires, head across the street to the Service Ontario to get your license renewed. It takes less than half an hour since it’s not as busy as other locations in Toronto.

TIPS: OTHER RESOURCES

  1. Like other drivers before me, there have been many who have taken their test in Guelph. If you want to research more routes, see some of these links below:

I hope this post helps you feel more prepared and informed to take the driving test.

GOOD LUCK!!

Review: I Still Love Calligraphy Online Course

In a previous post, I discussed how having a hobby can be a great outlet to help reduce stress. While I was looking for a new job, I decided to pick up a hobby that I had always wanted to do but didn’t have the time to focus on: calligraphy.

Originally, I wanted to take an in person calligraphy class in Toronto. I found sites such as the Calligraphic Arts Guild of Toronto and Calligraphy by Diane that had offered courses in the past or only taught traditional calligraphy. However, neither provided the style of calligraphy that I was hoping to learn at a time/price that I could afford.

The closest business that offered a comprehensive modern copperplate calligraphy course in Toronto was the Shop. For $130, anyone can sign up for a two-day course (3 hours each day) to learn the basics of calligraphy. However, I had to wait a few months before the next class was available and I was too eager to wait.

I searched online and there were a variety of free lessons online such as those offered on Julie Blanner’s website. However, I found that there wasn’t enough detail for me to understand what I needed to do to master calligraphy techniques. It’s a great introduction to calligraphy overall though.

After a bit more research, I came upon Melissa Esplin’s site, I Still Love Calligraphy. On this site, she offers a 30 day online program with instructional videos, lessons, assignments, practice guides and personal feedback to help take your basic ABC’s to fully decorated words. I went from this:

IMG_4258

to this:

FullSizeRender(2)

If you order the supplies from them, they will give you additional time as you wait for your supplies to come. Shipping to Toronto is unfortunately slow so it took me almost two weeks to get the supplies. In the mean time, I was able to start watching the videos, reading the lessons and practicing on my own.

SUPPLIES

I liked the selection of products that were provided by I Still Love Calligraphy. However, if you want, you can buy your supplies from Paper and Ink Arts (the go to supplier in the industry) at the same time that you are purchasing the online course. From my experience, the products from Paper and Ink Arts will likely arrive at the same time or before your package from I Still Love Calligraphy would.

I was super eager and went to Above Ground Art Supplies and Curry’s in Toronto to pick up some of the basic supplies such as nibs, ink and an oblique pen holder. Both companies offer a variety of products overall, however, have a limited selection of calligraphy supplies. This is perfect for beginners, however, those looking for more variety should stick with Paper and Ink Arts. A great find at Above Ground Art Supplies was a pad of lined paper specifically made for calligraphy practice so you don’t have to draw them in.

LESSONS

In the past, I’ve taken a variety of online courses and I’ve generally been disappointed by the quality of courses and lack of feedback provided. Melissa’s lessons are concise with tons of clear and useful pictures that help you to understand the content. Her lessons have enough detail that you understand what you need to do and most of your questions are answered in the content. There are also supporting instructional videos where you can repeatedly watch her technique. Unlike in a classroom setting, you can watch the instructor a few times, you can continue to watch the lesson until you get a grasp of the technique. I found the videos to be particularly valuable as it gave me an opportunity to compare minor details such as how I was holding the pen to how much pressure I was putting on the nib.

After 30 days, you no longer have access to the course work. However, you will still have access to the feedback that Melissa and her associate Erika have provided you in the past. Alternatively, you can purchase the course again and have the class extended for an additional 30 days.

TIME

Personally, I enjoy this online class because you can take the lessons whenever you want. You don’t have to wait for other people to be ready or wait for a specific time to go to class. Unfortunately, when it comes to motivation and keeping up with the classwork, it really does depend on the person. However, if you’re willing to invest in the class, I really hope you’re going to follow through with it.

Additionally, I enjoy having ample time to practice my technique before moving on to the next step. In some of the classroom settings, I find you are either rushed to learn all of the lessons within the time frame given or you run out of time and miss out on the advanced lessons. Neither are beneficial in mastering calligraphy. I value being able to learn at your own pace without missing out on all of the lessons.

ASSIGNMENTS

The assignments that Melissa provides are not overly difficult and should not take long to complete. Though it can take longer depending on how much time and effort you want to spend getting the technique right. Personally, I spent hours doing the assignments repeatedly until I felt that I had mastered the technique I had learned. I then submitted my assignments to get feedback. Anything I needed to fix, I was able to then correct immediately before it became a habit.

FEEDBACK

Melissa and Erika provide feedback twice a week which gives you just enough time to incorporate your feedback into your practice and begin working on the next assignment. I especially enjoy the feedback that is provided because both Melissa and Erika are very positive and encouraging. Their feedback is constructive and their keen eye will help to point out any mistakes you may be making. Their feedback sometimes includes pictures if it’s needed. I find the mixture of visual and written instruction to be beneficial as you can see strategies to help you fix your mistakes. I found I was able to adjust my technique very quickly with the diagrams.

SUGGESTIONS FOR CHANGES

1. While limiting the course to 30 days helps from a workload perspective and keeps people motivated to complete the course, I think it would be great to have the option of paying for additional feedback time at a reduced rate. Alternatively, for those who have completed the course, if they want to repurchase it, they should have the option of doing so at a reduced rate. For the most part, by the time people get to the end of the 30 days, they should have mastered the basic techniques. It’s really about refining the details which the coursework will not provide customers. If they haven’t learned by that point, they should repurchase the entire course so they have the lessons available again.

Customers can consider joining forums such as The Curious Calligrapher or the Fountain Pen Network. However, from a branding perspective, it would be beneficial for the company to be the ‘expert’ in Calligraphy and continue to garner that respect.

2. While I know that everyone has to develop their own style of calligraphy, it would be great to have practice sheets of other styles/fonts to get ideas from. It’s also a great way to practice different elements that you may want to incorporate into your own style. The Postman’s Knock has a variety of templates that you can pay for and download to learn and practice new styles. This would be a great additional revenue stream for the company.

3. Develop an advanced class that focuses on flourishes and personal style. Once a person has learned the basics and they may want to be challenged to continue developing the art, so it would be great to have more lessons. For advanced students, Melissa already offers more difficult assignments. It would likely not require as much work as starting from scratch.

4. I would love to see the selection of courses expanded to the folded pen or to chalk calligraphy as well. Each are beautiful applications and can help people to develop their skill as a versatile calligrapher.

SUMMARY

Overall, I would highly recommend this course to anyone. By far, the best and most comprehensive online course I have taken (and not just for calligraphy). Other bloggers or calligraphy experts would do well to learn how to provide as much value to customers as I Still Love Calligraphy does.

Tips and Tricks: Managing Emotions while Job Hunting

As you may know, I was recently laid off and have since been looking for a new role to help continue my career. I am very excited to announce that I have found a new role that will be taking me to San Francisco, California! This will be the beginning of a new and exciting chapter in my life that I cannot wait to begin.

But getting here hasn’t been easy. It has been an emotional roller coaster ride that at times tested by will and my belief in myself. If you are going through a similar situation, my advice is to not let your emotions overwhelm you. Stay focused on what you want and what you need to do.

Below are some tips that helped me stay positive and productive:

1. Stay connected with your support network of friends, family and loved ones.

Staying indoors can make you paranoid and increase your stress levels. Surround yourself with people who want the best for you and their positive encouragement will help to keep you motivated. Additionally, your support network will likely also have jobs and they can refer you into companies that they work for. Generally, referred candidates have a higher likelihood of being asked in for interviews. So this may be advantageous for you.

2. Make time for your favourite hobbies, activities or stress outlets.

Undoubtedly, you will be faced with a lot of stress as you worry about your future and finances. Make time for activities that you enjoy such as running, yoga, tennis, etc. This will help to prevent you from becoming crippled by your stress and help keep you sane.

3. Find a new space to work in.

Staying in your house all day can become demoralizing very quickly if you also do not go outside. Getting a change in scenery can help increase your productivity as you don’t have any distractions to hinder you. For me, I found working at a Starbucks with my friend helped me to stay focused. It doesn’t even have to cost much; I brought most of my own food and I bought one tea to make myself feel better. A library, community center, friend’s house, etc. can be a welcome change.

4. Create a realistic plan for each day.

I cannot stress enough the importance of creating a realistic plan for your day. Expecting to get a job in a day is unlikely. However, breaking down your goal into smaller tasks that can be easily accomplished will ensure that you are consistently working towards your goal. Even if you are only asking yourself to accomplish one task, seeing yourself make progress will encourage you to continue. Eventually, you will be motivated and able to add more tasks to your list for the day.

5. Follow a routine.

Just because you’re not at work, it doesn’t mean that you should let yourself sleep in or stay out late all the time. Continuing to use your normal working hours (ex. 9 a.m. to 5 p.m.) to focus on your job search will ensure that you give yourself ample time to achieve your tasks. It will also help you get back into the rhythm of working once you find a new job.

6. Keep your imagination in check.

It’s easy to get caught up in the worst case scenarios because you really don’t know what’s going to happen in the next few weeks. But letting your imagination run wild and considering all the what ifs can cause you to lose your motivation. Remember that 80-90% of the things that we worry about never happen. So don’t leap to the worst case scenario. Focus on what you are doing now to work towards your goals.

7. Never stop believing in yourself.

Don’t allow a feeling to become a fact in your mind. For example, if you are not hearing back from companies, don’t get the thought in your mind that your application wasn’t good enough therefore you aren’t good enough. The fact is that recruiters are busy, there are certain rules in place about the number of candidates that must be interviewed for the position and it takes time to find a job. Some circumstances are completely out of your control or have no reflection on your quality as a candidate.

One quote that I found particularly helpful is from Paulo Coehlo’s book the Alchemist, “people need not fear the unknown if they are capable of achieving what they need and want.”

Remember, you are obviously capable enough to get the job that you were laid off from. You are definitely capable enough to get another one. Don’t stop believing in yourself or your dreams. If you don’t believe you’re great, you can’t sell yourself to recruiters and they won’t be able to see how amazing you are.

Hopefully there aren’t many of you out there that need this advice. But if you do, I wish you all the best with your job search!

Tips and Tricks: LinkedIn Etiquette

Without a doubt, LinkedIn has revolutionized the way professional network today. While etiquette in person

Even though it is a social networking platform, there are many of us who are still unsure about the proper etiquette for this site.

Over the past few months, I have cultivated a variety of tips and tricks for using LinkedIn. The following tips should be kept in mind at all times:

  • Always be professional: the impression you make on LinkedIn can have a huge impact on your career.
  • Always be honest: never stretch the truth because people will know
  • Do your due diligence before reaching out to a contact: people are busy and will not want to help you if it requires too much extra time and effort.

SETTING UP YOUR LINKED IN PROFILE

1. Which profile picture should I choose?

Choose a professional looking head shot. No photos with a group of people as no one will know which one is you! Keep in mind that this photo does not need to be taken by a professional. However, you should at the very least be wearing a blazer or a business professional outfit. Make sure that your appearance is clean and neat as people can make judgments about your attention to detail and overall work ethic based on how put together you are. Make sure that there is good lighting so that people can see your face (this will be very important in just a second)!

Most importantly, choose a photo where you are genuinely smiling. Much like online dating, people are drawn towards individuals that seem approachable and friendly. All companies are looking for someone who is easy to work with and you will want to appear to be a good fit. If you want recruiters to approach you on LinkedIn, you definitely want a friendly picture! So smile! 🙂

2. How much should I write on my profile?

LinkedIn isn’t like a resume where you are restricted to a single page. You can take more space to provide detail about what it is that you do. Recruiters will appreciate this as they have a better understanding of whether or not you are a fit for the role or company.

Much like a newspaper, you will often lose interest as you go further down the page so keep the most important skills/experiences that you want to highlight at the top.

3. Why should I keep my contact list open to my connections?

LinkedIn is all about connecting people professionally. If you wanted to know more about a company and your friend knew a connection, I’m sure you’d want to know that information! Make sure that you offer the same courtesy to others.

On that train of thought, don’t be afraid to introduce connections with each other, especially if they have mutual needs. Helping people find each other will put you in a great position later when you need to get in contact with someone.

4. How do I make sure my employer doesn’t know that I am interviewing based on my LinkedIn profile?

As you may know, in many companies it is highly frowned upon to be looking for another job. So the worst thing to have happen is your manager or coworker noticing that you have updated your profile (which is usually an indicator that you are actively seeking a new role).

To minimize this risk, turn your privacy settings so that your network isn’t notified when you edit your profile. On the other hand, make sure that your profile is public so that recruiters can find you and see whether or not your skills and experiences are relevant to the role that they are trying to fill.

MAKING CONNECTIONS ON LINKEDIN

1. How often should you be using LinkedIn?

If you are actively seeking employment, you should be using it daily to stay up to date with the newest job postings and to network with professionals. If you are not actively looking for a new job, you should still log in weekly to maintain professional relationships and stay up to date with your contacts’ changes and career progressions. Do not wait until you need a job to get your profile updated. As soon as you are in a new role, spend time to update your contacts, get recommendations and endorsements, etc.

2. Who should you connect with on LinkedIn?

Unlike Facebook, Instagram or Twitter, having more contacts does not equate to being more popular. To be able to leverage your connections in the future, you need to spend time now developing relationships with these people. You may want to consider that the more people you have in your network, the more difficult it becomes to manage meaningful relationships.

Not everyone will recommend this but I highly suggest staying connected with individuals from a variety of industries and companies. Life changes quickly and you never know what direction you will end up in. Having a few individuals who you can talk to in different industries can help you in the future if you decide to move into a new role or if you are looking for specific information to further your goals.

Below are some ideas of where some of these connections can be found:

  • Classmates (ex. Elementary School, High School, University/College, etc.)
  • Teachers or professors
  • Coworkers (including managers and supervisors)
  • Recruiters from other companies
  • Professional Networks (i.e. those you meet from a seminar or professional designation)

3. Can I connect with a recruiter on LinkedIn?

Yes! Of course you can! While it can be intimidating for people to reach out to recruiters, it can actually be helpful for them. Instead of them looking for talented and qualified individuals, you are self-identifying yourself for the role. If there isn’t a specific role that you are looking for, you have at least put yourself on their radar for other future postings.

4. How do I connect with someone I don’t know well?

LinkedIn has a generic message that can be used for someone you know well. However, there are times when we need to reach out to someone we may not know or someone we know very casually. In these instances, it is best to send a message with your invite so that they don’t click “I don’t know this user” which can cause you to lose your LinkedIn account!

If you don’t know what to say, here’s an example of a message that you can send:

Writing a Message 2

5. How do I ask for an introduction from one of my contacts?

If you know that the person you are trying to reach is associated with one of your contacts, you can try to reach out to your connection to get an introduction so that you do not need to cold message them. Depending on the closeness of your relationship, you will need to figure out the best way to reach your contact (ex. email, phone call, LinkedIn message, in person meeting, etc.).

If you are going to email or send a LinkedIn message to your contact, below is an example of what you can write. You will also want to consider writing an introduction for yourself to make it easier for your connection.

Getting an Introduction

6. What should I do if I haven’t heard back from a contact that I messaged or a person I sent a connection invite to?

Follow up! This person may not be ignoring you; he/she may be on vacation, may not get alerted when messages are received, may have forgotten or may have a variety of other reasons why they are not responding.

If it is an urgent issue (ex. getting a referral for a job posting that is closing soon) then I would wait up to a week for a response. However, if there is no deadline to meet, then I would wait up to a month for a response.

Below is an example of a message that you can send to follow-up:

Following Up

7. How do I respond to someone I don’t know or I do not want to connect with?

If you can’t find any way that you are mutually acquainted (ex. no mutual education, contacts, companies, etc.), you can always reply and ask them to remind you how you know them.

If you don’t want to connect with an individual who has reached out, you can simply Archive the request or you can click “I do not know this user”.

8. How do I ask someone to write a recommendation for me?

It is best to contact a colleague, coworker, former manager, or former teacher soon after you have left your previous role/connection point so that you are still fresh on their mind. It is best to reach out to those who you have had a positive relationship with. Remember, you can always choose not to put up a recommendation that someone has given you (though that might be offensive given that the individual has spent the time to write you one).

Below is an example of an email that you can send. Depending on how close of a relationship you have, you can make your language more or less formal.

Recommendation

COMMUNICATING ON LINKEDIN

1. How often should I post links or status updates?

Every time you post a link, image or update, it is a reflection of you and the message that you want to share with your contacts. You do not want to overwhelm your contacts with links every hour as people will be unable to sift through the relevant and important information.

Instead, choose one or two links or status updates you want to share per day. Keep in mind that for status updates, you want to use them to highlight any achievements or major changes in your professional life such as a promotion, receiving an award or moving to a new company. Always keep your message positive! You never want to criticize or be negative on LinkedIn as this looks poorly on you.

2. What is the appropriate length of time to respond to a LinkedIn message?

If you think of LinkedIn messages as an email, you’ll remember that 1 – 2 days is an acceptable period to respond. Even if you are writing to tell them that you will respond another day, it will be appreciated. No one likes to be ignored.

3. What do I do about ‘stalking’ on LinkedIn?

Most people feel uncomfortable with the fact that other individuals can see that you have looked at their profile. Most of the time, people know that you are simply curious about their professional background. Unless you are looking at a coworker, in which case, that can get uncomfortable for the both of you. Also, don’t ever start a message with “I see you viewed my profile”. It is very creepy.

If you would like more anonymity, consider changing your settings so that people cannot see that it was you exactly that looked at their profile. All they will see is that an individual in x industry looked at their profile.

Don’t be afraid to look at a person’s profile because you don’t want them to see that you looked at their profile. It makes it a lot easier to build a rapport with an individual if you know something about them.

4. When sending messages to multiple recipients, remove the check-mark for “allow recipients to see each others names and email addresses”

It seems like you are sending out a mass, spam message when everyone can see who has received the same message. On LinkedIn, it’s all about making personal connections. Making a rookie mistake like this can look very poorly on your ability to be attentive to details while also alienating you from your connections.

I hope you learned a few tips and tricks about how to navigate on LinkedIn while maintaining your professionalism. If you have additional pointers, please add them!

Good luck!

Life: The Stages of Grief being Laid Off

It is said that there are five stages of grief: denial, anger, bargaining, depression and finally acceptance.

Despite what others say, my employer leaving Canada is very much a reason to be grieving, especially for those who worked here. Even though the company made a lot of mistakes when it entered the Canadian market, it was still an amazing company to work for and I will miss it dearly.

The first two days after the announcement that the company was closing, I was in so much shock that I couldn’t think. I laughed at the unfortunate timing because I simply could not comprehend the situation. I updated my resume very quickly (and very poorly, I might add) and started sending it out. I didn’t even look at the job postings properly. I just applied to anything that said Merchandising. In retrospect, it was a very poor decision to mass send out my resume without thinking about what was best for my career and my life plans.

On the second day, I went to a store because I needed to pick up some supplies. I was floored by the number of customers I saw in the parking lot, in line at the cash registers and shopping with carts full of product. I have never seen a store that busy in my life. I was livid at the customers. As I walked through the store, I could hear customers chatting amongst each other trying to find the best bargains and commenting about how great the prices were. The sad part is that everything was still at regular price. Why did Canadians wait until NOW to give Target a chance? Why wait until now? If only all of these customers had come in a few months ago, all of us employees might still have our jobs.

I spoke to the cashier and she mentioned that their actual sales had already tripled their expected sales for the day. And the silliest thought occurred to me. Maybe, we won’t close down because the stores are seeing such great sales now. Maybe, the Marketing team would say, “Psych! We are still in business. This was a big marketing scheme.” But in my heart I knew that this would never happen.

As the information settled in my mind, I got mad again because the Board of Directors MUST have known that the sales would spike following the news of the company leaving Canada. With the increased sales, we were surely going to hit our sales targets for the 2014 Fiscal year and the CEO would look absolutely fantastic to the shareholders. Especially since our parent company just announced that it would be giving out dividends to its shareholders. Add to the fact that the liquidators would not be getting the inventory until the beginning of Fiscal 2015, meant to me that the parent company would be taking all of the sales. The timing just worked out too perfectly. The parent company didn’t even have to pay us our bonuses for hitting the sales targets which was another cost saving initiative for them. And the fact that the severance is paid out over time means that it won’t be hitting 2014’s fiscal numbers which again makes the numbers look great. Sure, there are probably other factors that were considered by the Executive team and I am probably completely wrong about some of my conclusions but these were just the angry thoughts of a recently laid off employee.

My last day at work was the saddest day. A group of us had a last meal together before we went back to the office. I signed all my paper work, gave back my badge and laptop and just like that, I was no longer an employee.

With time, I have come to acknowledge and accept that this is probably one of the best things to ever happen to me as it is forcing me to think about what I want in life and giving me the freedom to do anything that I want.

But I will still miss the people. I worked with an amazing group of individuals who made each and every day enjoyable and worth coming in for. I will miss the culture of teamwork, collaboration and positive intent. There are so few places were people treat each other with respect and kindness all the time and I’m not looking forward to being at another company with mean politics. I will miss the focus on personal and career development. My managers and I talked about this every week and sometimes everyday. No other company that I have ever worked for has cared this much about helping to train and improve its employees.

As a customer, people may not have understood the company or the leaders’ decisions. But for those of us in the company, we know how hard we worked to make the company a success (often staying until midnight and coming in on weekends) and how amazing the company could have been if only we had more time.

I will miss working for this great company.

Review: Women’s Sorel Tofino Boots

As I was preparing for my trip to Iceland, I realized I needed a pair of comfortable, warm and waterproof boots that I could wear outside for extended periods of time without getting cold or wet. Unfortunately for me, my Uggs were falling apart and my Hunter boots had too much rubber to keep my toes warm (even with the fleecy sock attachment).

Another unfortunate situation for me was the fact that the week I was buying my boots, it seemed that every retailer was putting their Sorel boots on deeply discounted prices. That meant very limited sizes and styles were available for me by the time I had done all of my research.

Sorel Tofino Boot

Purpose:

As the Sorel website mentions, the Tofino Boot is definitely made for casual wear. You absolutely should not be wearing these boots for hiking or for icy/deep snowy conditions. I noticed right away that there isn’t a lot of grip on the bottom of the boots. I was walking on patches of ice and I almost slipped several times. Even on wet floors, I slipped a few times.

Might be best for late fall or early spring wear.

Warmth:

If you are in and out of buildings most of the day, then these boots will be adequate for -20 degree Celsius weather. However, if you are outdoors for anything longer than an hour or if you get snow on the top of foot, your toes will get cold very quickly. I would recommend wearing extra layers of socks or toe warmers. However, if you plan on doing this, you should also buy the boot a size up as it is quite snug.

Waterproof:

These boots may be useful for light drizzly rain. Otherwise, I would not consider these boots to be waterproof. I was on a beach and a wave washed over my feet. The water did not above my ankle but unfortunately for me, the water got into my boots and made my feet wet. Granted, it wasn’t a lot of water but it was still uncomfortable for the rest of the day.

Fit:

Runs small. You may want a size up.

Pricing:

Approximately $150 CAD, I think it’s a relatively affordable price. However, you can find the Joan of Arc for the same price sometimes and that boot is a little sturdier and warmer.

Comfort:

With the right size, these boots can be quite comfortable. I found that with time, the boots started to scratch up the back of my feet which made it difficult to wear for extended periods of times.

OVERALL RATING: Would not buy again. Even on regular winter days, these boots would not offer much warmth, waterproofing, or safety. I would try another pair of Sorel boots.

Travel: Review of Blue Lagoon

The Blue Lagoon is one of the most famous and visited attractions in Iceland. The Blue Lagoon is a Scandinavian styled spa (i.e. it has outdoor hot water pool) that is naturally heated with geothermal energy. All the water in the pool is refreshed every two days so that you are not sitting in filth.

Things to Consider Packing:

  • Swim Suit
  • Sunscreen
  • Sunglasses
  • Face Cream
  • Waterproof Camera (Optional)
  • Towel (Optional)
  • Flip Flops (Optional)
  • Hair Brush (for Women)
  • Beauty supplies (for Women)

Getting to the Blue Lagoon:

The Blue Lagoon is situated approximately 50 minutes away from Reykjavik. Alternatively, if you are coming in from the airport, it is only 20 minutes away. You can drive to the location yourself as there is ample parking and this gives you the flexibility to stay as long as you want. Alternatively, most tour companies will take you to the Blue Lagoon from the airport or from your hotel in Reykjavik. Gray Line and Reykjavik Excursions will also take you to the airport from the Blue Lagoon or back to your accommodations.

TIP: If are you coming from the airport or plan on leaving for the airport from the Blue Lagoon, there are lockers on site in a separate building right by the tour bus drop off location. It costs approximately $5 CAD per bag. They accept credit cards so you don’t have to worry about currency.

Pricing:

There are four different packages which have a variety of features which is seen below:Blue LagoonFrom a value standpoint, if I were to go back, I would choose the Standard package. The main benefit to the Premium/Luxury packages that I saw was that you got to bypass the line to buy the package. However, if you go early in the morning (which I highly recommend that you do), the line isn’t too busy. Everything else is just nice to have. I mean are the table reservations, use of towels and bathroom or the cheap flip-flops really worth an additional $20 CAD?

Similar to other baths in Europe, all your information is stored in a wrist band. It acts as your entrance into and exit out of the Blue Lagoon. It also will be the key to your locker. Payments will also be expensed on your wristband.

In the Change Room

Once you are through the entrance, you’ll see that there are several change rooms. On quiet days, you will only have access to one change room. Depending on the package you got, you may be in the exclusive change room. I’m only going to talk about the main changing rooms though. Once you get in, there are little stations where you can get ready after you’re finished at the bath. They have hair dryers, cotton swabs, mirrors and electrical outlets. On the other side, there are racks for you to put your shoes. Icelandic people are very hygienic when it comes to baths so you will be required to switch to flip-flops at a certain point.

There are many rows of lockers and you can use any available locker. Unlike traditional Icelandic pools, the Blue Lagoon has change rooms in every row of lockers for the more modest people. Once you are ready to go to the bath, you can lock your locker by simply shutting the door and scanning your wristband over the blue light in the center of the console. If you forget your locker number, there are stations that you can swipe your wristband over and it will tell you the number.

Heading over to the showers, there are hooks as well as a shelf for you to put your towel in on the sides. Personally, I find it super helpful to use the shelves as it keeps your stuff from getting mixed up with others. It is mandatory to shower before you go into the pool. Shower gel and conditioner are provided. Some of the showers have doors. Others do not. Depending on how modest you are, you can use the showers with the doors or not. Note, that you cannot go back into the locker room area without completely drying yourself off first. This helps to keep the locker area clean and dry (take note Canada).

Once you’re done showering, you can head into the pool. Most people take a towel or their bathrobe with them. There are hanging racks for you to put your stuff on. Personally, because you’re running in and out of the water, I don’t think it’s necessary to take it out and I prefer to leave it indoors so that it is warm and dry when I need it later.

In the Pool

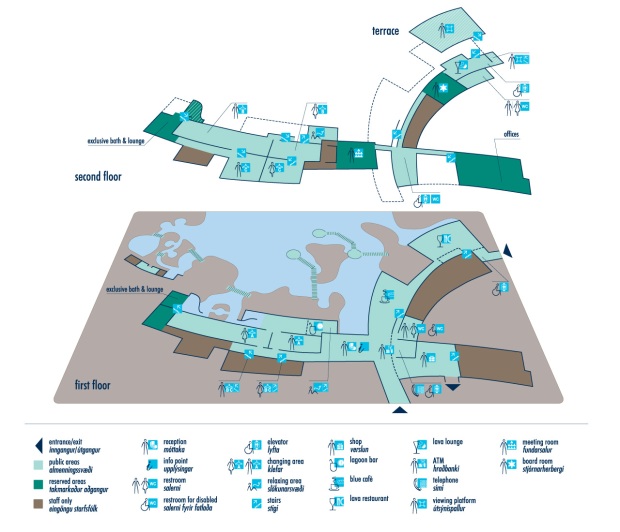
There is only one main pool. There are different parts to the Blue Lagoon and some of the features include a Sauna, Steam room, waterfall, relaxation area and spa treatment area. There is also a drinks station where you can buy alcohol, smoothies and other drinks. Most of the packages include one free drink and most visitors take advantage of it. You can also pick up your Algae Mask from here if you are entitled to one. Blue Lagoon MapThere are stations around the pool where you can put on an Algae mask which is supposed to be good for your skin.

TIP: Be careful not to get the water in your eyes when you are rinsing it off though. The water burns your eyes!

Leaving the Pool

Remember to shower before you head to the locker room area. As I mentioned earlier, there is shower gel and conditioner for you to use. It is recommended that you simply put conditioner in your hair so that you can absorb the nutrients. Personally, I found that my hair became a bit stiffer than normal and by the end of the day my hair had become a lighter shade. The water doesn’t cause any damage though.

Don’t forget that you need to be completely dry before you head into the locker area. Once you have changed, there are plastic bags in the beautification area for you to put your wet swim suits in.

Any other expenses that you may have incurred on your wristband will have to be paid before you can leave the Blue Lagoon. Even if you haven’t bought anything extra, you will need to stop at the cash register before you can leave so that they can validate what you purchased.

There is a shop where you can purchase skins products and souvenirs as you exit the Blue Lagoon. Many of the same products can be found at the airport. Buying it at the airport is beneficial as you don’t have to worry about getting a tax refund.

Hope you have a relaxing time at the Blue Lagoon!

Travel: Iceland

Introduction:

If you are thinking or planning on going to Iceland, you should know right away that you’re going for its natural beauty or for its history and culture. While Reykjavik is the largest city in the country, it still only has a population of approximately 120,000. Think about it; that’s only 1/20 of the population of Toronto! So if and/or when you go, prepare to be outdoors and not in museums or cathedrals.

There are two main times of the year to visit: in the middle of winter or during the summer. The summer is when the weather is beautiful and the attractions are easier to get to. However, the winter is also a great time to go because there are experiences you can only get during this time of the year such as the Aurora Borealis and it is much cheaper.

Either way, I highly recommend staying for a week so that you have time to see and do everything without feeling rushed.

Basic Facts:

Iceland has a long history going back to the 9th century AD when the Celtics and the Norseman first settled in Iceland. Until 1944 (during WWII), Iceland was under Denmark rule and poverty-stricken. There are places on the north side of Iceland where people continued to live in Turf houses as late as the 1960s. Most structures that are man-made were built within the last 70 years meaning that most buildings that you visit will seem relatively modern compared to older structures in Europe. Everyone speaks English so you don’t have to worry about trying to pronounce those very difficult spelling words. Credit card is accepted everywhere in the country so you can survive without foreign currency if you want.

Accommodations:

Most people stay in Reykjavik which is the capital city of Iceland. Like most cities, Reykjavik has a downtown and an area that is considered the outskirts. Most of the newer hotels such as the Hilton hotel are situated on the outskirts of town. A unique situation with Reykjavik is that the location of your accommodation does not matter. Paying more for a hotel is really about name and experience more so than anything else. Being closer to downtown does not really benefit you much other than to be close to restaurants but even then (as I’ll explain later) this is not much of a benefit.

I stayed at the Reykjavik Lights Hotel which costs about $100 per night for a basic two singles/a double room. Right next door to us was the Hilton Reykjavik Nordica Hotel which costs about $300 per night for the same type of room. Now you might think that the Reykjavik Lights Hotel that I stayed at might have been older or had poor service or in some way was sub par. However, I found that the hotel was very reasonable. The building seemed almost brand new. I did not notice any mold or accumulated residue in the bathroom tiling that I often find in older hotels. The rooms had all of the basic necessities. I do, however, want to point out the rainfall shower and the heated towel rack in the bathroom that I thoroughly enjoyed. The hotel also had magnetic key cards that turned on/off the lights int he room and if you left the door ajar an alarm would go off. Complimentary buffet breakfast was provided which had greater variety and quality than many of the US hotels I’ve been to that serve ‘Continental Breakfast’.

TIP: Try and find accommodations on the very edge of downtown in order to minimize costs and maximize your time.

Transportation:

There are four main ways to travel in Iceland: walk, public transportation, tour bus or renting a car.

One of the few attractions in Reykjavik

One of the few attractions in Reykjavik

As I mentioned earlier, Reykjavik does not have as many sites within the city compared to a place like London, UK, for example. So you could pay for a more expensive hotel to be in downtown so that you can walk to the few museums and churches that exist. However, there will be no benefit to you if you are traveling outside of the city.

Alternatively, you can take Iceland’s thoroughly extensive public bus system called Straeto that covers the entire country and many of the attractions. You can buy a one way ticket for ISK 350 which is approximately $3.50 CAD. You can also get the Reykjavik City Card which has 24, 48 or 72 hour options costing between ISK 3.300 to ISK 4.900 (or approximately $33 to $49 CAD). Depending on how many sites you visit in town, this City Card may be worthwhile for you. However, I didn’t stay in the city long and while touring outside of Reykjavik, I did not see a single public transportation bus any of the days that I was there. So likely, the public transportation does not come frequently. All in all, I personally didn’t find a need for the public transportation.

I’m usually not a fan of tour buses because I like to have the freedom to go at my own pace. However, I had to concede this time to taking a tour bus because of its convenience. Every single tour bus company will pick you up at your hotel which is another reason why staying in downtown Reykjavik is not beneficial. If the tour company is picking up multiple people, the closer you are to downtown, the earlier you will have to be to be ready for pick up and the later you will be dropped off. The larger tour bus companies are fantastic, well-oiled machines. They have miniature buses come to pick people up at select hotels that are near each other. The small buses then go downtown to the main bus hub where people from other small buses merge onto a larger bus. Depending on the timing of the tour, on the way back, you have the option of being dropped off at your hotel or downtown. Since the tour companies drop you off pretty much anywhere you want to go, other transportation isn’t necessary. I was lucky that the tours I booked were small and had no more than 4 people (other than the Northern Light tour). We were able to be very flexible and ask to have places added or removed from our itinerary. Also, having a local resident show us some of the best sites was beneficial as we would never have been able to find them by ourselves. Gray Line and Reykjavik Excursions are the two biggest tour bus companies and operate very similarly. Both also offer transportation to and from the airport. Other tour companies offer nuanced tours that are geared towards being more adventurous (such as ATV tours) or taking photos.

In the summer, renting a car can be beneficial. There isn’t a lot of traffic in Iceland (given the small population), most roads are paved and the signage is clear. Also, you have the freedom to stay as long or as short as you want at each location. Prices can range from $110 CAD to $210 CAD per day depending on the type of vehicle that you rent. Prices also include tax, unlimited mileage and insurance. Obviously, prices are much cheaper in the winter. However, I would warn about driving in the winter with a rental. Especially for those who don’t drive in snow, ice or other extreme weather conditions often, I would not recommend driving in the winter. For example, I was in a tour bus and the wind was so fierce that the bus was blown into another lane causing some swerving and anxiety. We saw many rental drivers stuck on the side of the road because they had decided to stop and fell into the snow bank and couldn’t get out.

Taxing is expensive. So don’t use it if possible.

Weather:

As for the weather, Iceland has a small range of temperature never going below -10 degrees or above 15 degrees Celsius. I always thought that Iceland would be much colder than Toronto due to its location. However, Iceland is along the path of the North Atlantic Current which means that from a temperature perspective, it is relatively warm. Nonetheless, there are strong winds through the country that make it feel much colder at times. Especially as a tourist that is outdoors for most of the day, it can feel bitterly cold.

There is a saying in Iceland, “if you don’t like the weather, wait 5 minutes and it will change”. So be sure to be ready for any weather condition.

In the summer, the days are very long and you might even see the Midnight sun. So you will want sunglasses and a wind and water-resistant jacket as it can begin raining at any moment. Hiking boots are also highly recommended if you are going to be outdoors. And layers. Don’t forget the layers.

In the winter, you will definitely need a warm coat, preferably one that is down insulated as well as wind and water-resistant. Hat, gloves/mittens, and scarves are a must. I even saw some tourists wearing ski goggles. Wear tons of layers because you can never be too warm in the winter. Very warm waterproof boots are a must. Warm socks are also highly recommended. Last but not least, I would highly recommend investing in hand warmers.

TIP: Trust me when I say that they are life savers if you are going to be outdoors for extended periods of time (for example, if you are waiting to see the northern lights). Get enough to fit some in your shoes as well.

There is a weather forecast for the Northern Lights which can be found on Iceland’s Meteorological Website.

Attractions:

Below is a summary of my favourite attractions in Iceland.

The Aurora Borealis is not exclusive to Iceland. However, many tourists go to see them at night. You can take a tour bus or you can drive out by yourself. Either way, if you’re in Iceland in the winter time, try to spot it!

Aurora Borealis

The Blue Lagoon is a must see and do. The water naturally has a mixture of Algae, Silica and Sulfur which give the water its infamous blue colour. The water is said to help heal and improve skin conditions. They also have masks around the lagoon that you can put on that are supposed to be good for your skin.

Blue LagoonThe Geysir is a well-known attraction that is part of the Golden Circle. It is one of the few geysers in the world that still exist and erupt. The Geysir can reach heights of 50 meters or more in the air. While I was there, the Geysir erupted approximately every 5 to 10 minutes.

TIP: You can always tell when it is about to explode because the water starts to “breathe”. The surface of the water looks like a chest as if air is filling and leaving the lungs.

GeysirThe Gullfross Waterfall is the largest and most powerful one in Europe. It is also part of the Golden Circle. On misty days, it can be difficult to take pictures of it. Apparently, there is a slightly dangerous path that you can take to get closer to the waterfalls for pictures. But I would not recommend that you do this without proper spiked shoes to keep you grounded.

Thingvellir National park is unique for several reasons. It is the location of the first parliament of Iceland hundreds of years ago, the country’s largest lake is located in this park, it is one of the locations that the Game of Thrones was filmed and it is also the location of the snorkeling and diving expeditions over the North Atlantic rift. We noticed that a bridge we were walking on had to be built because the road that used to be there had split. The tectonic plates are shifting apart causing the road to split and it unveiled a 100 meter drop below. This park as well as Great Rift Valley of Eastern Africa are the only places in the world that you can see two tectonic plates moving away from each other.

TIP: All of Iceland’s water is clean. So you can drink the lake water in Thingvellir National park. Icelandic people also think it’s a waste of money to buy bottled water.

TIP: The lake water is always between 2 to 3 degrees Celsius in all seasons. So if you want to go in the winter time, you will be equally as cold as in the summer time. Remember to keep your hands behind your back and out of the water and you will stay warm.

SnorkelingSeljalandsfoss is usually part of the South Coast Tours. It is a beautiful and narrow waterfall that is lit up when it is dark out. In the summer, you can go behind the waterfall to see the water drop. However, in the winter time, the ground becomes icy and it is too dangerous to go.

Another famous waterfall along the South Coast of Iceland is Skógarfoss. It is situated in a canyon like area. On sunny days, you can see a rainbow. In the summer, the blue against the green grass and the rainbow is just like a postcard.

WaterfallYou can take a tour of a Glacier on Eyjafjallajökull (or E-15 as American’s call it). Unfortunately for me, the winds were too strong on the day I was supposed to go so it was canceled. However, I can imagine that it would be a great experience to hike on a glacier.

Reynisfjara is the location of the black sanded beach and the rock columns near Vik in the South Coast of Iceland. It is a magnificent sight to behold as the ocean waves crash down on the beach. Keep in mind that the current is very strong so you probably should not go swimming in the water. It is can also be extremely windy at times. In the summer time, you can see Puffin.

Black Sand BeachSkaftafell National Park is 4 hours away from Reykjavik but definitely worth the visit. There are ice caves to discover in the winter time that are a stunning view.

The Vatnajökull glacier in the summer time is a very interesting view which might be memorable to some who have seen movies such as Batman Begins or Tomb Raider. In the summer, icebergs break off from the glacier and float away.

Food:

Iceland is well-known for its seafood, especially Cod. But that’s about it. There are many well rated restaurants on Tripadvisor that you can try out. The Fish Market is one of the most famous restaurants in all of Iceland. So you may want to try it out.

Dried cod is also a pretty famous snack. Asian tourists seem to like it a lot and it certainly has a distinctive flavour and smell.

If you decide to go to Iceland, I hope you have a great time!